This post is about the Arduino software i am writing to use it as a programmer and some of the features available.
Demo
This movie shows me using the Arduino Console to program the Racal Cougar.
The Arduino programmer
I would like the Arduino to be able to act as both a menu driven programmer and to program the Racal Cougar with pre defined channel information by simply connecting it to the programmer without having to connect a computer (fill gun).
Not all features are implemented yet and there are some hurdles to take before it will be fully functional. Nevertheless, a lot has been done already and a most of the features are implemented in the Arduino already.
Menu driven programmer
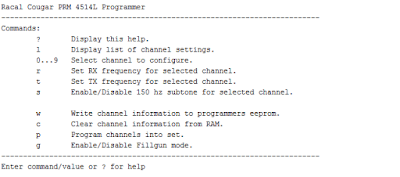
Program the Racal Cougar by connecting the Arduino programmer to the computer using an USB cable and open a serial console like the one available in the Arduino IDE where commands need to be entered.
Commands
? (Question mark)
Displays information on the available commands
 |
Display a list containing information about the channel frequencies currently stored in the RAM of the Arduino. This list is loaded with values stored in the Arduino's EEProm upon boot.
 |
| Channel list |
0..9
To change the transmit and receive frequency for a channel one first needs to be selected. Press the channel number on the keyboard and confirm by pressing Enter to select a channel:
 |
| Channel 0 selected |
r (lowercase "R")
To change the receive frequency for the selected channel press the "r" button on the keyboard and confirm by pressing Enter.
| Select set receive frequency mode |
After this mode is selected a frequency from 66 to 88 Mhz can be defined by entering a value in Khz, i.e. 70012.5 for 70.0125 Mhz and 70450 for 70.450 Mhz.
 |
| Receive frequency changed |
t (lowercase "T")
Changing the transmit frequency for the selected channel can be done by pressing the "t" button on the keyboard and confirm using the Enter.
 |
| Selecting the transmit frequency mode |
After this mode is selected a frequency from 66 to 88 Mhz can be defined by entering a value in Khz, i.e. 70012.5 for 70.0125 Mhz and 70450 for 70.450 Mhz.
 |
| Transmit frequency changed |
s (lowercase "S")
To enable or disable the 150 Hz (transmit) sub-tone for a channel.
05/02/2017:
Implemented this in the software, see part 4
w (lowercase "W")
To store the current channel frequencies defined in the Arduino to the Arduino's permanent storage, the EEProm press the "w" button and confirm by pressing Enter
| Store channel info in EEProm |
Clear the current channel settings in the Arduino's RAM by using the "c" button and confirm by pressing Enter.
| Clear current channels |
This command doesn't affect the channel information stored in the EEProm.
p (lowercase "P")
To program the channel settings into the Racal Cougar, press the "p" key and confirm by pressing Enter. The programmer will respond with "OK" when the program operation is successful and "Error" in case of a failure.
| Successful program response |
g (lowercase "G")
Enable the fill gun mode. In this mode no computer is needed to program the device, just connecting it to the 7 pole connector would be sufficient to start the program sequence.
This command isn't implemented yet.
Fill Gun mode
The fill gun mode will basically emulate the Racal fill gun (MA-4083) and would allow you to connect the Arduino to the Racal Cougar without having to connect it to the computer were after some checks the Racal will be programmed using the contents of the channel list stored in the Arduino EEProm.This functionality isn't implemented yet.